Oz Nerf - Australian Nerf Community

Would you like to react to this message? Create an account in a few clicks or log in to continue.
Oz Nerf - Australian Nerf Community

Nerfing down under!. Oz Nerf - Australian Nerf Community

If you're new to the forums please do the following.
1. Read the Forum Rules before posting!
2. Update your location, age and avatar TRUTHFULLY
3. Introduce yourself in the Welcome to Oznerf forum section =)

Navigation

Statistics

Our users have posted a total of 52416 messages in 3425 subjects

We have 1922 registered users

The newest registered user is seabulb

Latest topics

» gold coast nerf war?
by ShaGGz LMS Fri Oct 07, 2016 3:49 pm

» nerf clearout
by Runeblade Wed Sep 07, 2016 7:03 am

» How to replace the Longshot trigger plate?
by neon64bit Mon Jan 04, 2016 9:42 am

» Mid North Coast/Hunter War Organisation
by Vampros Thu Dec 31, 2015 6:18 pm

» WTB felt for slugs
by Richo123 Sat Oct 24, 2015 6:21 am

April 2024

MonTueWedThuFriSatSun
1234567
891011121314
15161718192021
22232425262728
2930     

Calendar Calendar


2 posters

    Strikemaker: Brass Barrel Strikefire

    Roger Explosion
    Roger Explosion
    Administrator
    Administrator


    Posts : 334
    Join date : 2009-04-27
    Age : 36
    Location : Adelaide: Murder Capital of the world

    Strikemaker: Brass Barrel Strikefire Empty Strikemaker: Brass Barrel Strikefire

    Post  Roger Explosion Fri May 01, 2009 8:36 pm

    I Haven't finished the paintjob yet, but here it is in its current state. Note that i can oly cock the gun with a screwdriver. Ill come up with a better way to cock it later.

    Strikemaker: Brass Barrel Strikefire IMGP1541

    Strikemaker: Brass Barrel Strikefire IMGP1542

    What we have here is a Strikefire with a brass barrel, No slide and no ammo holder

    And heres how I did my brass barrel replacement.

    Strikemaker: Brass Barrel Strikefire Xfiremod01

    Here it is stock, in all its lime green glory.

    Strikemaker: Brass Barrel Strikefire Xfiremod02

    and without the slide

    Strikemaker: Brass Barrel Strikefire Xfiremod04

    Bust it open

    Strikemaker: Brass Barrel Strikefire Xfiremod03

    and find a good place to put the billion screws

    Strikemaker: Brass Barrel Strikefire Xfiremod05

    so heres the barrel its self, which is found inside the black part. This blaster being a Inverted plunger design, this is the part that dosen't move. I opened this gun up earler and put some tape over the hole in the barrel, but this will become redundant when we move on.

    Strikemaker: Brass Barrel Strikefire Xfiremod06

    So chop that black part off the orignal barrell and cut your self a fresh 3 inch (7.6 CM) piece of K&S 17/32 stock brass tubing. Which can be found at hobby shops which deal in model airplanes. For you Adelaideians I got mine from Hobby Habbit. (so you know your buying the right diamater, bring a test dart)

    Strikemaker: Brass Barrel Strikefire Xfiremod07

    Now sand the inside of the black part so the brass tube will fit, then glue the two togehther.

    Strikemaker: Brass Barrel Strikefire Xfiremod08

    Then cut this front part off the orignal barrel

    Strikemaker: Brass Barrel Strikefire Xfiremod09

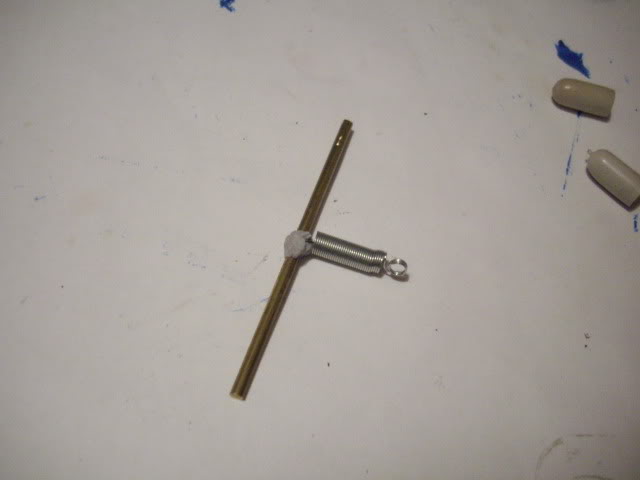
    and glue this onto the front of the new brass barrel. this part is needed so the plunger doesn't drag the brass barrel back with it, and you don't want that

    Strikemaker: Brass Barrel Strikefire Xfiremod11

    heres the front of the new barrel
    Roger Explosion
    Roger Explosion
    Administrator
    Administrator


    Posts : 334
    Join date : 2009-04-27
    Age : 36
    Location : Adelaide: Murder Capital of the world

    Strikemaker: Brass Barrel Strikefire Empty Re: Strikemaker: Brass Barrel Strikefire

    Post  Roger Explosion Wed May 06, 2009 8:19 am

    Now for my soultion for cocking the plunger.

    Strikemaker: Brass Barrel Strikefire IMGP1568
    Start with some K&S 3/32 Brass rod (K&s brass, my solution to anything) and cut around 6 Cm off, but you can do any length you feel depending on the size of your hands. But just make sure you will have enough to fit through the body of the blaster.

    Strikemaker: Brass Barrel Strikefire IMGP1571
    Then feed it thorugh the spring that the old slide used to use, and glue it in the middle. I used blu tack becasue I was lazy. then attach the spring and all back to where it used to go.

    Strikemaker: Brass Barrel Strikefire IMGP1569
    Then I got these little rubber nubs from a rubber coated metal coat hanger

    Strikemaker: Brass Barrel Strikefire IMGP1574
    And stuck them over the ends of the brass rod for some nice safe soft ends. NOTE! use blu tack or a tempoary adhesive or you will never get the two halves of the blaster apart again.

    Strikemaker: Brass Barrel Strikefire IMGP1575
    and one more pic for good luck
    random guy
    random guy


    Posts : 78
    Join date : 2009-03-08
    Age : 26
    Location : Sydney,NSW

    Strikemaker: Brass Barrel Strikefire Empty Re: Strikemaker: Brass Barrel Strikefire

    Post  random guy Wed May 06, 2009 2:55 pm

    very nice mod and now i finally know how to do that barrel replacement. btw you really need to always put those rages in.

    Sponsored content


    Strikemaker: Brass Barrel Strikefire Empty Re: Strikemaker: Brass Barrel Strikefire

    Post  Sponsored content


      Current date/time is Fri Apr 26, 2024 4:33 pm