

Hi guys,
Received my upgraded spring today, so here's the tutorial on basic mods for the Swarmfire.
I'd like to thank SgNerf and OzNerfNerd for their supply of parts to perform this mod.

Tools:
Materials:
DISASSEMBLY
Begin by removing the screws. As opposed to the Q16, this blaster is a dream to open up.

Just don't forget to remove the battery cover, before splitting the shell in half.
Remove 3 screws, and split the motorised plunger mech unit in half. There are four catches that need to be pryed out for it to open up. There's also an orange clip that holds the turret in alignment, which also needs to be removed.

Note the position of this spring, located underneath the plunger mech casing.

AIR RESTRICTOR REMOVAL
Remove the plunger tube from the casing. Pry off the head of the tube with a screw-driver or similar. This is a pretty difficult task, as it's glued on. You could possibly use hot water or zippo fluid to dissolve the glue, but I managed without using either. Once you have the plunger head off, remove the orange AR and spring. Note, it would be possible to drill this out, if you're extremely careful. There is a white ring underneath the AR, that the spring sits on. Don't remove this, as it acts as a limit of travel for the plunger head.
Once you've removed the AR etc, replace the tube cap, and blue in place using epoxy adhesive or similar. I actually plastic welded it back on, as I'm fairly impatient.
NB: don't do this if you're not familiar with the process, and remember to use a well-ventilated area.

SPRING AND O-RING UPGRADE
Remove the plunger rod. Replace the spring, and o-ring. I purchased these as a kit from SgNerf. Also, because the AR has been removed, it's a good idea to add a plunger buffer pad - I've used one purchased from OzNerfNerd off of ebay.
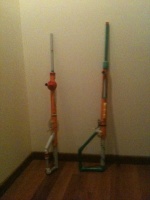
Picture shows assembled unit with after-market upgrades, Stock spring is on the right.

VOLTAGE UPGRADE (16.8v)
While the blaster is apart, bare the ends of the battery snap. Feed the wires through the battery casing, and solder the battery snap to the terminals on the underside. The terminals are marked as well.

You'll need to remove quite a fair bit of the centre divider of the orange battery casing, as well as some of the moulding on the inside of the battery cover, for the 4 x AA battery holder to fit. You could also use 6 x AA to C battery adapter's. 4 with the 14500 batteries, and 2 used as dummies.

Re-assemble the blaster. I found it's easier to remove the plunger mech casing out of the shell, and hold it vertically to to join it back together.
Now for ranges:
Tests were conducted outside, using blue foam stinger's, with doubled washer's.
Stock.
Flat from shoulder: 41 feet
Angled from hip: 55 feet
Modified.
Flat from shoulder: 67 feet
Angled from hip: 91 feet
That equates to a 165% range increase on both angled and flat firing platforms. With identical ROF and slightly increased range, it's definitely good competition to the Stampede. The only down-side to the SF is no modular clips, but the decreased weight balances this out somewhat.
Finally, it is possible to remove the dart posts in the turret with a dremel or similar rotary tool. This is more to allow the use of different dart types, and adds minimal range increase.
Cheers,
Received my upgraded spring today, so here's the tutorial on basic mods for the Swarmfire.
I'd like to thank SgNerf and OzNerfNerd for their supply of parts to perform this mod.
Tools:
- Basic tool-kit
- Soldering iron, solder etc
- Dremel/rotary tool
- Multi-meter - optional
Materials:
- Upgraded spring
- O-ring
- Plunger buffer
- 4 x 14500 unprotected Li-ion batteries
- 4 x AA battery holder
- 9v battery snap
- 5-minute Araldite or similar
- Silicone grease or similar
DISASSEMBLY
Begin by removing the screws. As opposed to the Q16, this blaster is a dream to open up.
Just don't forget to remove the battery cover, before splitting the shell in half.
Remove 3 screws, and split the motorised plunger mech unit in half. There are four catches that need to be pryed out for it to open up. There's also an orange clip that holds the turret in alignment, which also needs to be removed.
Note the position of this spring, located underneath the plunger mech casing.
AIR RESTRICTOR REMOVAL
Remove the plunger tube from the casing. Pry off the head of the tube with a screw-driver or similar. This is a pretty difficult task, as it's glued on. You could possibly use hot water or zippo fluid to dissolve the glue, but I managed without using either. Once you have the plunger head off, remove the orange AR and spring. Note, it would be possible to drill this out, if you're extremely careful. There is a white ring underneath the AR, that the spring sits on. Don't remove this, as it acts as a limit of travel for the plunger head.
Once you've removed the AR etc, replace the tube cap, and blue in place using epoxy adhesive or similar. I actually plastic welded it back on, as I'm fairly impatient.
NB: don't do this if you're not familiar with the process, and remember to use a well-ventilated area.
SPRING AND O-RING UPGRADE
Remove the plunger rod. Replace the spring, and o-ring. I purchased these as a kit from SgNerf. Also, because the AR has been removed, it's a good idea to add a plunger buffer pad - I've used one purchased from OzNerfNerd off of ebay.
Picture shows assembled unit with after-market upgrades, Stock spring is on the right.
VOLTAGE UPGRADE (16.8v)
While the blaster is apart, bare the ends of the battery snap. Feed the wires through the battery casing, and solder the battery snap to the terminals on the underside. The terminals are marked as well.
You'll need to remove quite a fair bit of the centre divider of the orange battery casing, as well as some of the moulding on the inside of the battery cover, for the 4 x AA battery holder to fit. You could also use 6 x AA to C battery adapter's. 4 with the 14500 batteries, and 2 used as dummies.
Re-assemble the blaster. I found it's easier to remove the plunger mech casing out of the shell, and hold it vertically to to join it back together.
Now for ranges:
Tests were conducted outside, using blue foam stinger's, with doubled washer's.
Stock.
Flat from shoulder: 41 feet
Angled from hip: 55 feet
Modified.
Flat from shoulder: 67 feet
Angled from hip: 91 feet
That equates to a 165% range increase on both angled and flat firing platforms. With identical ROF and slightly increased range, it's definitely good competition to the Stampede. The only down-side to the SF is no modular clips, but the decreased weight balances this out somewhat.
Finally, it is possible to remove the dart posts in the turret with a dremel or similar rotary tool. This is more to allow the use of different dart types, and adds minimal range increase.
Cheers,
Last edited by clunk07 on Fri May 27, 2011 1:45 pm; edited 1 time in total