
** PICTURE INTENSIVE POST **
Before I begin, I want to clearly state that this mod is solely for research and practise purposes.
If you decide to perform this mod or something similar to this mod, know that a singled / single dart firing Hydro Cannon IS BANNED AT WARS.
In my opinion, even if it is RSCB'd or Hoppered or Choppered, it IS STILL BANNED FOR USE AT WARS.
So, think twice first before performing this mod.
Okay so I saw this video by Jerm781:
and in it, he swapped the stock Hydro Cannon (HC) pump with an Air Tech 2000 pump, and all he did was install a coupler at the muzzle of this blaster. What got me interested was the sheer velocity of the rocket being fired. I told myself that I had to try that out.
After the HC hit the stores here in my country, I sought reviews from fellow nerfers like SGNerf and Fish, and they mentioned that the stock pump was really puny and you needed to pump it at least 40 times to get a decent amount of air. I thought about it and I didn't want to have to pump 40 times inbetween each shot if I was going to convert this water blaster into a dart blaster.
I saw internal pics on the modworks blog, and I decided that once I get a HC for myself I would remove the water tank, move the entire air tank assembly towards the back of the blaster, and create an internal RSCB, much like how my Shot Blast and my Mega Strike blasters are made.
But... The internals were not as I had expected. And thus began my 1.5 week journey of this brain wrecking, finger numbing, hand hurting conversion.
Here goes.
--------------------------------------------------------------------------------------------------------------
So I picked up this dope ball pump:

I found this Umbro Double Action ball pump at a sports store. It's a ball pump, so that means that air volume per pump would be rather high, and double action means that 1 "pump" would actually be the equivalent of 2 pumps.
So I cut out some spare vinyl tubing I had from a broken RF20 and connected it to the air output of the Umbro pump. It was an easy job. Unscrew the gold metal cap, take out the stock connector, squeeze in the RF20 vinyl tube, apply plumber's goop, screw the gold cap back on and let the goop cure.


Then, I opened up the HC.
I epoxied the pump to the stock plastic pump connector.

Then I cut the tube to the water tank, and removed the water tank totally.

This next part is purely for cosmetic purposes only. You can choose not to do this if you dont want to.
I got myself a length of 55mm thinwall PVC pipe, cut it into half, and epoxied it on the inside of the shell, to cover up the "holes" in the back of the shell.

Then, I took out the air tank assembly, and before I dremelled off the orange cap at the mouth of the air tank, I did some test fitting with PVC tubes, and surprise, surprise:

20mm Thinwall UPVC fits perfectly over the orange cap.
So I nested some 16mm thinwall UPVC into the 20mm thinwall UPVC and epoxied everything down.
Now look at the front orange piece:

yes, a 16mm thinwall UPVC will nest perfectly into the muzzle area, with no need to dremel anything at all. The rest of it just shows the nesting compatibility, which is also the barrel material I will be using.
Now, on to the chopper.
Why Chopper?
I initially wanted to create an internal RSCB for this blaster... but once you take a look on the inside, there will be absolutely no space for you to fit an internal RSCB. At the same time, I didn't want a super long Hopper clip sticking out and blocking my line of sight... so I decided to make a chopper instead.
First, I got some Europet PETG and created a half-pipe at one end. This end will be going into the barrel end of the PVC wye.
(no, I'm not going to do a tutorial on a chopper or how a chopper works.)

Next, essential to the chopper is a 45 degree PVC elbow joint.
I had on me a 13mm 45degree PVC elbow joint and some 16mm PVC so I dremelled the inside of the 13mm elbow joint till stefan darts could fall through easily, and gooped a piece of 16mm thinwall UPVC on one end.

PVC wyes come in the US standard, which is the size of 15mm PVC, but I had only 13mm, 16mm and 20mm, so I broke out my dremel and dremelled the wye out a little bit till I could fit a 16mm thinwall UPVC pipe into the wye.

Next comes the main shell.
Shave / Cut / Sand / Dremel these down. I had to make sure that everything was flush / almost flush with the walls of the blaster or else the new pump would be blocked. (on both sides of the shells, please.) And yes, cut away the big screw post in the middle of the blaster.


I also had to cut out these parts on the left half of the shell (left half meaning the half where the screws would go)

and then I did this:

So now back to the orange piece at the front, I epoxied a small "ring" of 16mm thinwall UPVC into the muzzle area:

and then, I had to shave off the back part of the center rail to accomodate the chopper clip, like so:

So now, this is what the front area looks like:

Next, I had to think of a way to prevent the whole entire assembly from shifting back and forth within the blaster and I came up with this solution by taping 2 lengths of 16mm thinwall UPVC together:

and this is how it sits in between the back of the air tank and the back end of the blaster:

Then I roughly e-taped the pump into position against the air tank,
and figured that I needed a way to keep the pump in place too, so I came up with this solution using some 13mm UPVC:

I know that doesn't really make any sense to you until you see this:

and so, in order for that to work and not let my new "stopper" tilt, I cut a small ring of 13mm UPVC and did this:

and then I drilled some holes in the pump handle (dont worry, this didn't affect air flow at all) and used a cable tie to secure the PVC to the pump head.

It should be sitting inside that area something like this:

but in order for that to happen, I had to cut away a part of the 13mm UPVC:

with everything in place, I joined the tubes of the pump and the air tank together.
The RF20 vinyl tube nests perfectly over the HC's air tank vinyl tube, so all I did after nesting them was to just apply goop around the nested area.
Now that all the "securing" is done, it's on to the trigger.
Easy. I cut it down and drilled in a hole.

Then i hooked it up to the air release mechanism with some aluminium wire like so:

and at this point of time now, the blaster looks like this:

some close-ups (segment by segment)


Just before closing everything up completely, I did a test fit and realised that the shell was a little tight around the area where the chopper would be coming out so:

After I epoxied and gooped everything in place, I closed it up and thought to myself, "okay this is going to work!" but after being a ball pump, after pumping it up afew times, it will start to get really hard to pump, and so eventually the epoxy gave way. So, I did what I had to do, and used the good ol' cable tie method:


Of course, I gooped the entire area to make sure that there would not be any air leaks.
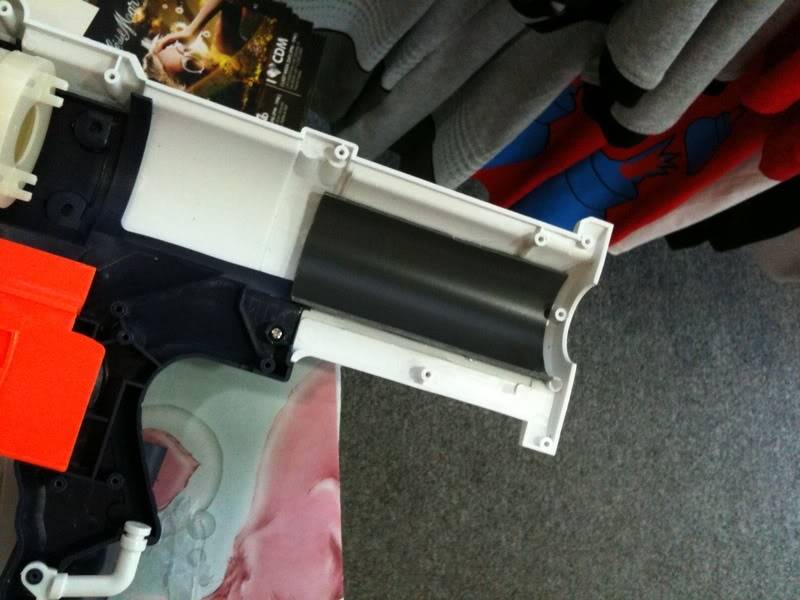
So this is what the internals look like currently:
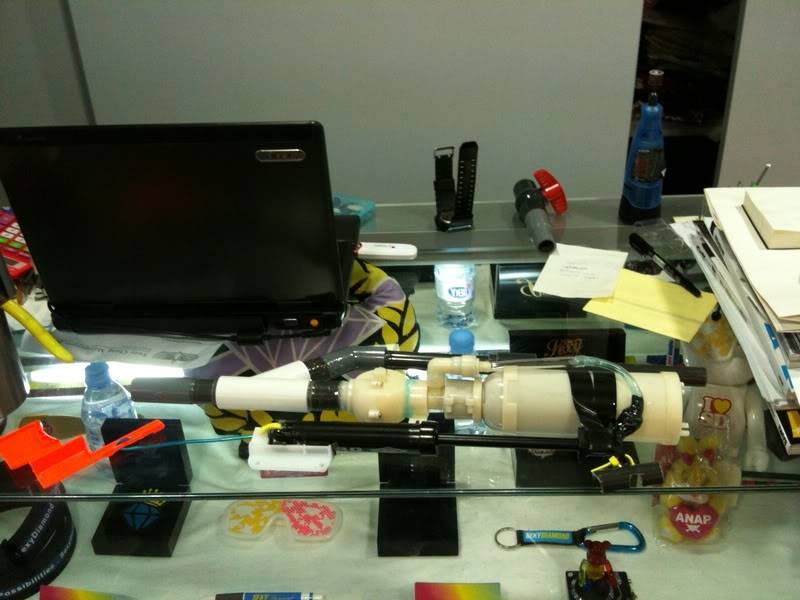
This is what it looks like in the shell.

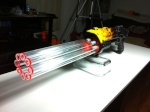
and now, my Hydro Cannon looks like this:

and to end it off, here's a video.
do I think modding this blaster is worth it?
seriously, no.
Before I begin, I want to clearly state that this mod is solely for research and practise purposes.
If you decide to perform this mod or something similar to this mod, know that a singled / single dart firing Hydro Cannon IS BANNED AT WARS.
In my opinion, even if it is RSCB'd or Hoppered or Choppered, it IS STILL BANNED FOR USE AT WARS.
So, think twice first before performing this mod.
Okay so I saw this video by Jerm781:
and in it, he swapped the stock Hydro Cannon (HC) pump with an Air Tech 2000 pump, and all he did was install a coupler at the muzzle of this blaster. What got me interested was the sheer velocity of the rocket being fired. I told myself that I had to try that out.
After the HC hit the stores here in my country, I sought reviews from fellow nerfers like SGNerf and Fish, and they mentioned that the stock pump was really puny and you needed to pump it at least 40 times to get a decent amount of air. I thought about it and I didn't want to have to pump 40 times inbetween each shot if I was going to convert this water blaster into a dart blaster.
I saw internal pics on the modworks blog, and I decided that once I get a HC for myself I would remove the water tank, move the entire air tank assembly towards the back of the blaster, and create an internal RSCB, much like how my Shot Blast and my Mega Strike blasters are made.
But... The internals were not as I had expected. And thus began my 1.5 week journey of this brain wrecking, finger numbing, hand hurting conversion.
Here goes.
--------------------------------------------------------------------------------------------------------------
So I picked up this dope ball pump:
I found this Umbro Double Action ball pump at a sports store. It's a ball pump, so that means that air volume per pump would be rather high, and double action means that 1 "pump" would actually be the equivalent of 2 pumps.
So I cut out some spare vinyl tubing I had from a broken RF20 and connected it to the air output of the Umbro pump. It was an easy job. Unscrew the gold metal cap, take out the stock connector, squeeze in the RF20 vinyl tube, apply plumber's goop, screw the gold cap back on and let the goop cure.
Then, I opened up the HC.
I epoxied the pump to the stock plastic pump connector.
Then I cut the tube to the water tank, and removed the water tank totally.
This next part is purely for cosmetic purposes only. You can choose not to do this if you dont want to.
I got myself a length of 55mm thinwall PVC pipe, cut it into half, and epoxied it on the inside of the shell, to cover up the "holes" in the back of the shell.
Then, I took out the air tank assembly, and before I dremelled off the orange cap at the mouth of the air tank, I did some test fitting with PVC tubes, and surprise, surprise:
20mm Thinwall UPVC fits perfectly over the orange cap.
So I nested some 16mm thinwall UPVC into the 20mm thinwall UPVC and epoxied everything down.
Now look at the front orange piece:
yes, a 16mm thinwall UPVC will nest perfectly into the muzzle area, with no need to dremel anything at all. The rest of it just shows the nesting compatibility, which is also the barrel material I will be using.
Now, on to the chopper.
Why Chopper?
I initially wanted to create an internal RSCB for this blaster... but once you take a look on the inside, there will be absolutely no space for you to fit an internal RSCB. At the same time, I didn't want a super long Hopper clip sticking out and blocking my line of sight... so I decided to make a chopper instead.
First, I got some Europet PETG and created a half-pipe at one end. This end will be going into the barrel end of the PVC wye.
(no, I'm not going to do a tutorial on a chopper or how a chopper works.)
Next, essential to the chopper is a 45 degree PVC elbow joint.
I had on me a 13mm 45degree PVC elbow joint and some 16mm PVC so I dremelled the inside of the 13mm elbow joint till stefan darts could fall through easily, and gooped a piece of 16mm thinwall UPVC on one end.
PVC wyes come in the US standard, which is the size of 15mm PVC, but I had only 13mm, 16mm and 20mm, so I broke out my dremel and dremelled the wye out a little bit till I could fit a 16mm thinwall UPVC pipe into the wye.
Next comes the main shell.
Shave / Cut / Sand / Dremel these down. I had to make sure that everything was flush / almost flush with the walls of the blaster or else the new pump would be blocked. (on both sides of the shells, please.) And yes, cut away the big screw post in the middle of the blaster.
I also had to cut out these parts on the left half of the shell (left half meaning the half where the screws would go)
and then I did this:
So now back to the orange piece at the front, I epoxied a small "ring" of 16mm thinwall UPVC into the muzzle area:
and then, I had to shave off the back part of the center rail to accomodate the chopper clip, like so:
So now, this is what the front area looks like:
Next, I had to think of a way to prevent the whole entire assembly from shifting back and forth within the blaster and I came up with this solution by taping 2 lengths of 16mm thinwall UPVC together:
and this is how it sits in between the back of the air tank and the back end of the blaster:
Then I roughly e-taped the pump into position against the air tank,
and figured that I needed a way to keep the pump in place too, so I came up with this solution using some 13mm UPVC:
I know that doesn't really make any sense to you until you see this:
and so, in order for that to work and not let my new "stopper" tilt, I cut a small ring of 13mm UPVC and did this:
and then I drilled some holes in the pump handle (dont worry, this didn't affect air flow at all) and used a cable tie to secure the PVC to the pump head.
It should be sitting inside that area something like this:
but in order for that to happen, I had to cut away a part of the 13mm UPVC:
with everything in place, I joined the tubes of the pump and the air tank together.
The RF20 vinyl tube nests perfectly over the HC's air tank vinyl tube, so all I did after nesting them was to just apply goop around the nested area.
Now that all the "securing" is done, it's on to the trigger.
Easy. I cut it down and drilled in a hole.
Then i hooked it up to the air release mechanism with some aluminium wire like so:
and at this point of time now, the blaster looks like this:
some close-ups (segment by segment)
Just before closing everything up completely, I did a test fit and realised that the shell was a little tight around the area where the chopper would be coming out so:
After I epoxied and gooped everything in place, I closed it up and thought to myself, "okay this is going to work!" but after being a ball pump, after pumping it up afew times, it will start to get really hard to pump, and so eventually the epoxy gave way. So, I did what I had to do, and used the good ol' cable tie method:
Of course, I gooped the entire area to make sure that there would not be any air leaks.
So this is what the internals look like currently:
This is what it looks like in the shell.
and now, my Hydro Cannon looks like this:
and to end it off, here's a video.
do I think modding this blaster is worth it?
seriously, no.
Last edited by psyk on Sun Mar 20, 2011 9:01 am; edited 2 times in total (Reason for editing : Whoops, left out one picture.)