
What's up, everybody.
So I picked up a Nerf Mono Blast from Blue (NH) and was happy to have received it.
Before this, I've never heard of a Mono Blast, and so after picking it up and playing with it, I figured that it was a "standard" pistol-type blaster.
I scoured the net to see if anyone had done anything crazy to this little sucker...
But I found out, instead, that there was not a single mod write-up or video done on this guy.
"That's a damn shame!" I thought. This guy is worthy of a mod, and worthy of being one of the better pistol blasters out there...
And that explains this write-up.
Please note that this is going to be a rather "realistic" write-up...
Because I did not have all the ideal tools (I will, of course, give you the best-case scenarios along the way)
and I made some mistakes (read: I <Censored> up) along the way, but I will also show you how I rectified them, with whatever I had on hand.
Just for the record, the two most difficult situations I faced while modding this blaster was:
1) Opening the blaster up
2) Removing the AR (with what I had on hand, you'll know why)
So let's go!
-------------------------------------------------------------------------
Here's what you need:
(Rather, here's what I had on hand)
- Philips Head Screwdriver (I had a loooooong one)
- Small Flat-head Screwdriver or small sharp object
- X-Acto Knife or a sharp Pen Knife
- Random Machine Screw (read the write-up and you'll know why)
- Lighter (for the flame, not the butane)
- Super Glue
- Goop
- E-tape
- Hotglue Gun
- Hotglue
- Silicon Lube
- A small piece of 15mm PVC pipe (or any similar sized ring-shaped object)
- stock Secret Shot One spring (read my write-up first though, I ended up not using it)
- Foam Padding (for padding your plunger head)
- Barrel Material of choice (Don't try to find the material I used... mine's a one-off.)
- Dremel with Sanding Drum / Grinding Stone (depending on the OD of your barrel material, you might not even need this)
Things I wish I had with me:
- Drill with a long drill bit
- Epoxy Putty
- Rubber Gasket for a plunger head replacement
- Better sized spring for this blaster (I've never seen a Lock n Load before, but I reckon whatever that can be used in an LnL can be used here)
------------------------------------------------------------------------
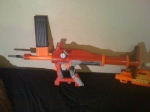
This is what the blaster looks like!

So I got my philips head screwdriver and removed all of it's 6 screws... But it just wouldn't open!
So I figured that it was glued down somewhere, and I was right... so...

Make sure you be gentle... or else...

Beware of brittle plastic. You have to make sure you cut it all the way down.
Seems that one of the "connecting posts" was glued shut too. You can see it in the pic.

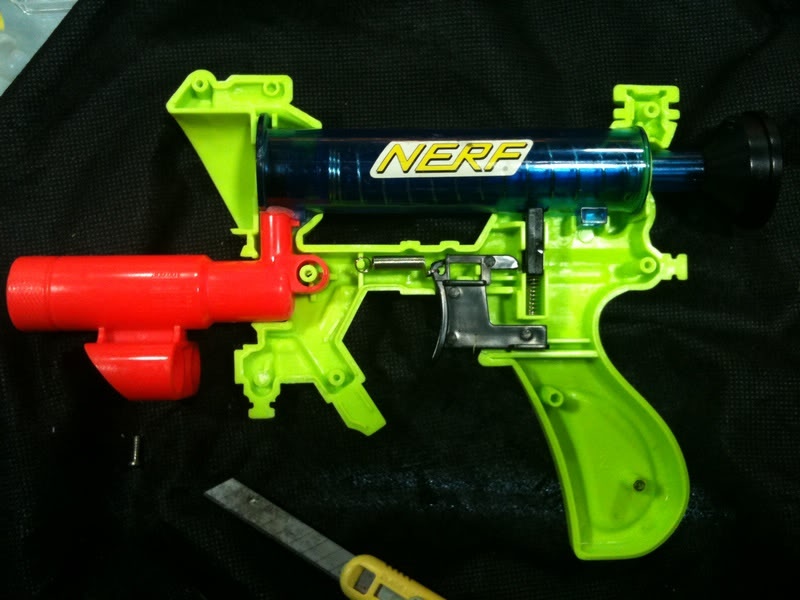
So after finally getting it open...
here's a customary Internals Pic
Next up, remove the plunger from the plunger tube.

I don't know if this is normal but my plunger head had a good 1mm space between the plunger tube.
And that translates to a sucky seal and sucky air delivery.
If I had a good sized rubber gasket, I'd use that as a plunger head replacement.
But I didn't. So...
Remove the rubber plunger head from the plunger rod. It pops right off.

Now grab some 15mm PVC pipe and do this:

I had some 1/2" CPVC, 13mm UPVC, 15mm PVC, 16mm UPVC on hand and the 15mm PVC worked perfectly for this.
If you have a ring-like object of a good size, then it'd probably work too.
Leave the rubber plunger head on the 15mm pvc aside for now. I'm trying to make the rubber flare a little wider. (because it's made in such a way that it does not invert.)
Next up... you'll notice that the stock barrel and plunger tube are glued together.
All it took was a light twist from me and they came apart, without any damage to the connecting pieces.

Now check out the barrel and AR setup:

I poked around with my screwdriver and realised that this whole thing is a single-moulded piece of plastic.
It's crazy right? Single piece! No glue whatsoever.
Here's a drawing of the cross section. Pink denotes the airflow.

Yup, the air "duct" gets mega-tapered towards the tip... I mean, we're already losing so much air from the sucky plunger seal, but now this?
If you're wondering how I knew the air release was so tapered, well I actually tried to twist the "dart post" (or so I thought it was) out with a pair of long-nosed pliers...
But then the first 1/3 of the "dart post" broke off, and that's how I found out about the airflow, the air release hole, and all the internals.
Thus, I didn't include the long-nosed pliers because you're not gonna need them.
Right now, if you had a drill with a long drill bit, this is gonna be super easy! Just drill through.
But I didn't have those... so out came my lighter and my long philips head screwdriver...

I heated the screwdriver up for a good 30secs and then shoved it into the air release hole, and melted my way through till it was almost at the back of the barrel.
Once my screwdriver cooled down, I got my random machine screw (which was rather wide by the way) and twisted my way in.
This is what it looked like:

So, if you're planning on using a drill with a long drill bit, be extra careful not to go apeshit and drill through the back of the barrel, mmkay?
Now with the AR aside and the airflow improved, let's head on back to the plunger rod.
The "scope" is actually the priming bar... and it holds the key to replacing / adding your springs!

So grab your small flathead screwdriver or small sharp object and slowly (gently + steadily) ease the cone-shaped black part out of the actual clear plastic rod.
I am over 9000, so I sorta screwed that up:

Put that aside for now. I mean, I put that aside while I cursed and swore at myself for that.
I went back to the rubber plunger head.
I don't have a pic of this but this is plain and simple to understand...
I took the rubber plunger head out of the 15mm PVC pipe, put some hotglue into the now-partly-expanded area and put the 15mm PVC pipe back on.
You can see some of the hotglue overflowing:

It looked like this after the glue cooled:

I did this so I could make sure that the general extra-flared shape was set.
Then, I filled the rest of the space with hotglue:

Keep checking to see if the seal is better now. I overdid it, and I'm currently using the plunger head without any hotglue in it.
It's giving me a good seal right now, but I know it won't be long before the rubber goes back to it's original width.
Remember to add your padding on the head of the plunger.
After doing all that I got my stock Secret Shot One spring and slipped it over the stock Mono Blast spring.
Don't use a Secret Shot spring though. But why, pSyk? Everything looks good when you put it all back together!

Well, look again at the internals pic, and you'll see that the blaster is made in such a way that it gives you a very tight margin of space between the spring and the catch...
so the Secret Shot One spring was getting caught in the catch mech. I ended up taking that thing out. Right now (and in the demo video below), it's powered by just the stock Mono Blast spring.
By now I was feeling less upset about my screw-up earlier so after putting the whole plunger rod assembly back together, I got to fixing the back of my damaged plunger rod...
and with hotglue on hand, I did this:

If I had epoxy putty, I'd be using that instead. But... yeah.
We're almost done! The rest is super-easy.
Get your barrel material. I used 4 inches initially, but now that I'm using just the stock Mono Blast spring, I've reduced the barrel length to 3 inches.
Depending on the OD of your barrel material, you will either have to dremel the inside wall of the Mono Blast barrel, or wrap some e-tape around your barrel material.
Then, superglue or goop the improved barrel back onto the plunger tube, and superglue or goop your barrel material into the stock barrel.
The next two pics are pretty self-explanatory.


Put everything back in place (it's super simple!) and close this baby up!

Here's a video I made of this!
Last thing to note...
You could just seal the plungertube-to-barrel connector up, drill a hole at the front of the plunger tube and slap on a coupler / barrel and you'd get a simple pistol shooter,
but I wanted to maintain the aesthetics of this blaster... I mean, c'mon, it's a nice old blaster...
I can't tell you about stock ranges simply because I don't have any of it's stock darts...
But after modding, it fires slugs about 40ft flat. And that's with the hotglue removed from the plunger head, and with only the stock Mono Blast spring.
If I can get my hands on another one of these, I definitely would. I hope this will help you guys out there who have a Mono Blast but are afraid to crack it open!
So I picked up a Nerf Mono Blast from Blue (NH) and was happy to have received it.
Before this, I've never heard of a Mono Blast, and so after picking it up and playing with it, I figured that it was a "standard" pistol-type blaster.
I scoured the net to see if anyone had done anything crazy to this little sucker...
But I found out, instead, that there was not a single mod write-up or video done on this guy.
"That's a damn shame!" I thought. This guy is worthy of a mod, and worthy of being one of the better pistol blasters out there...
And that explains this write-up.
Please note that this is going to be a rather "realistic" write-up...
Because I did not have all the ideal tools (I will, of course, give you the best-case scenarios along the way)
and I made some mistakes (read: I <Censored> up) along the way, but I will also show you how I rectified them, with whatever I had on hand.
Just for the record, the two most difficult situations I faced while modding this blaster was:
1) Opening the blaster up
2) Removing the AR (with what I had on hand, you'll know why)
So let's go!
-------------------------------------------------------------------------
Here's what you need:
(Rather, here's what I had on hand)
- Philips Head Screwdriver (I had a loooooong one)
- Small Flat-head Screwdriver or small sharp object
- X-Acto Knife or a sharp Pen Knife
- Random Machine Screw (read the write-up and you'll know why)
- Lighter (for the flame, not the butane)
- Super Glue
- Goop
- E-tape
- Hotglue Gun
- Hotglue
- Silicon Lube
- A small piece of 15mm PVC pipe (or any similar sized ring-shaped object)
- stock Secret Shot One spring (read my write-up first though, I ended up not using it)
- Foam Padding (for padding your plunger head)
- Barrel Material of choice (Don't try to find the material I used... mine's a one-off.)
- Dremel with Sanding Drum / Grinding Stone (depending on the OD of your barrel material, you might not even need this)
Things I wish I had with me:
- Drill with a long drill bit
- Epoxy Putty
- Rubber Gasket for a plunger head replacement
- Better sized spring for this blaster (I've never seen a Lock n Load before, but I reckon whatever that can be used in an LnL can be used here)
------------------------------------------------------------------------
This is what the blaster looks like!
So I got my philips head screwdriver and removed all of it's 6 screws... But it just wouldn't open!
So I figured that it was glued down somewhere, and I was right... so...
Make sure you be gentle... or else...
Beware of brittle plastic. You have to make sure you cut it all the way down.
Seems that one of the "connecting posts" was glued shut too. You can see it in the pic.
So after finally getting it open...
here's a customary Internals Pic
Next up, remove the plunger from the plunger tube.
I don't know if this is normal but my plunger head had a good 1mm space between the plunger tube.
And that translates to a sucky seal and sucky air delivery.
If I had a good sized rubber gasket, I'd use that as a plunger head replacement.
But I didn't. So...
Remove the rubber plunger head from the plunger rod. It pops right off.
Now grab some 15mm PVC pipe and do this:
I had some 1/2" CPVC, 13mm UPVC, 15mm PVC, 16mm UPVC on hand and the 15mm PVC worked perfectly for this.
If you have a ring-like object of a good size, then it'd probably work too.
Leave the rubber plunger head on the 15mm pvc aside for now. I'm trying to make the rubber flare a little wider. (because it's made in such a way that it does not invert.)
Next up... you'll notice that the stock barrel and plunger tube are glued together.
All it took was a light twist from me and they came apart, without any damage to the connecting pieces.
Now check out the barrel and AR setup:
I poked around with my screwdriver and realised that this whole thing is a single-moulded piece of plastic.
It's crazy right? Single piece! No glue whatsoever.
Here's a drawing of the cross section. Pink denotes the airflow.
Yup, the air "duct" gets mega-tapered towards the tip... I mean, we're already losing so much air from the sucky plunger seal, but now this?
If you're wondering how I knew the air release was so tapered, well I actually tried to twist the "dart post" (or so I thought it was) out with a pair of long-nosed pliers...
But then the first 1/3 of the "dart post" broke off, and that's how I found out about the airflow, the air release hole, and all the internals.
Thus, I didn't include the long-nosed pliers because you're not gonna need them.
Right now, if you had a drill with a long drill bit, this is gonna be super easy! Just drill through.
But I didn't have those... so out came my lighter and my long philips head screwdriver...
I heated the screwdriver up for a good 30secs and then shoved it into the air release hole, and melted my way through till it was almost at the back of the barrel.
Once my screwdriver cooled down, I got my random machine screw (which was rather wide by the way) and twisted my way in.
This is what it looked like:
So, if you're planning on using a drill with a long drill bit, be extra careful not to go apeshit and drill through the back of the barrel, mmkay?
Now with the AR aside and the airflow improved, let's head on back to the plunger rod.
The "scope" is actually the priming bar... and it holds the key to replacing / adding your springs!
So grab your small flathead screwdriver or small sharp object and slowly (gently + steadily) ease the cone-shaped black part out of the actual clear plastic rod.
I am over 9000, so I sorta screwed that up:
Put that aside for now. I mean, I put that aside while I cursed and swore at myself for that.
I went back to the rubber plunger head.
I don't have a pic of this but this is plain and simple to understand...
I took the rubber plunger head out of the 15mm PVC pipe, put some hotglue into the now-partly-expanded area and put the 15mm PVC pipe back on.
You can see some of the hotglue overflowing:
It looked like this after the glue cooled:
I did this so I could make sure that the general extra-flared shape was set.
Then, I filled the rest of the space with hotglue:
Keep checking to see if the seal is better now. I overdid it, and I'm currently using the plunger head without any hotglue in it.
It's giving me a good seal right now, but I know it won't be long before the rubber goes back to it's original width.
Remember to add your padding on the head of the plunger.
After doing all that I got my stock Secret Shot One spring and slipped it over the stock Mono Blast spring.
Don't use a Secret Shot spring though. But why, pSyk? Everything looks good when you put it all back together!
Well, look again at the internals pic, and you'll see that the blaster is made in such a way that it gives you a very tight margin of space between the spring and the catch...
so the Secret Shot One spring was getting caught in the catch mech. I ended up taking that thing out. Right now (and in the demo video below), it's powered by just the stock Mono Blast spring.
By now I was feeling less upset about my screw-up earlier so after putting the whole plunger rod assembly back together, I got to fixing the back of my damaged plunger rod...
and with hotglue on hand, I did this:
If I had epoxy putty, I'd be using that instead. But... yeah.
We're almost done! The rest is super-easy.
Get your barrel material. I used 4 inches initially, but now that I'm using just the stock Mono Blast spring, I've reduced the barrel length to 3 inches.
Depending on the OD of your barrel material, you will either have to dremel the inside wall of the Mono Blast barrel, or wrap some e-tape around your barrel material.
Then, superglue or goop the improved barrel back onto the plunger tube, and superglue or goop your barrel material into the stock barrel.
The next two pics are pretty self-explanatory.
Put everything back in place (it's super simple!) and close this baby up!
Here's a video I made of this!
Last thing to note...
You could just seal the plungertube-to-barrel connector up, drill a hole at the front of the plunger tube and slap on a coupler / barrel and you'd get a simple pistol shooter,
but I wanted to maintain the aesthetics of this blaster... I mean, c'mon, it's a nice old blaster...
I can't tell you about stock ranges simply because I don't have any of it's stock darts...
But after modding, it fires slugs about 40ft flat. And that's with the hotglue removed from the plunger head, and with only the stock Mono Blast spring.
If I can get my hands on another one of these, I definitely would. I hope this will help you guys out there who have a Mono Blast but are afraid to crack it open!